Building your waiver forms
Create and edit the liability waiver text customers sign, and choose which one is used by default.
Where to find it
Waivers → Manage templates
Waiver templates is where you write the actual liability waiver text your customers sign — the legal language, plus any placeholders that fill in details like age limits or fees automatically.
Where to find it
Waivers → Manage templates (then + New Waiver Template)
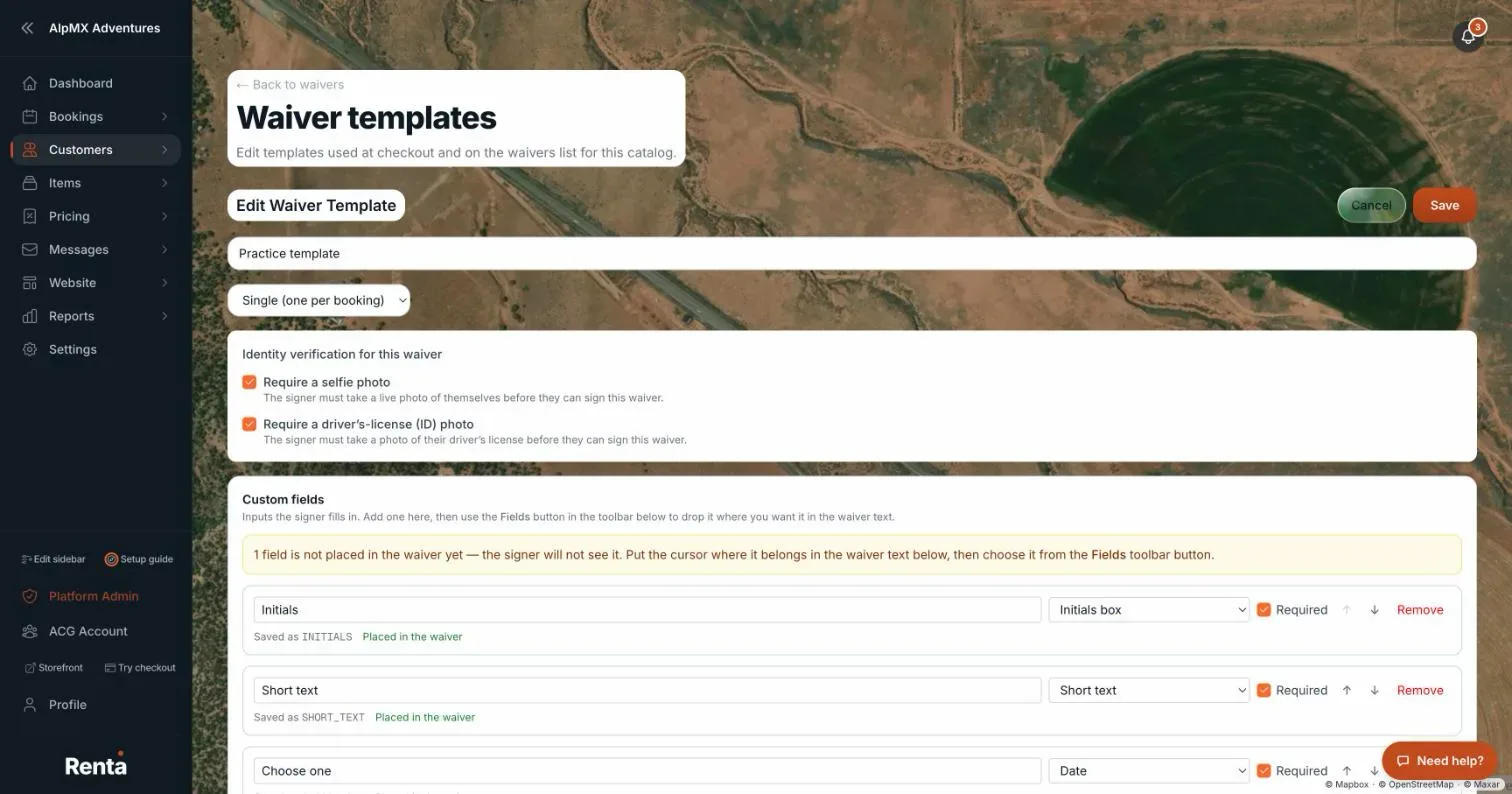 The waiver template editor with name, type, photo requirements, and body fields
How it works
- + New Waiver Template — starts a new template. Enter a Template name and the waiver text, choose Single (one per booking) or Per Rider (every rider signs their own copy), and press Save. The name and the text are both required.
- Require a selfie photo and Require a driver's-license (ID) photo — tick boxes that make the signer take a live photo before they can sign. A new template starts with the ID photo ticked and the selfie unticked, so turn the selfie on only if you want it. The template list shows a tag such as "Selfie + ID required".
- Fields — insert fields (such as + Add initials box) into the waiver text. The text can also use placeholders such as {{LATE_FEE}}, which pull values from your waiver policy.
- Set as default — marks which template new bookings use. The row then shows a Default tag, and Remove default takes it away (new bookings then fall back to the platform default).
- Clone, Edit — copy a template or change it.
- Archive — retires a template so it is no longer used for new bookings, after a confirmation. Restore brings an archived template back.
Example
If your dirt bike rental business needs a waiver that mentions helmets specifically, you create a new template, write the clause into the body, and set it as the default so every new booking uses it going forward.
Good to know
- Archived templates stay visible alongside active ones so you can restore them later.
- Templates and the default waiver are shared across your whole business. A practice booking uses the same templates, so changing one changes what real customers sign.
- Placeholders in the body (like a minimum age or a late fee) pull their values from Setting default waiver values — set those first so a template doesn't show a blank.
- When a rider signs a waiver with an email address, Renta matches them to the customer in your list with that email (ignoring capital letters), or creates a new customer if there is none. A rider who signed a waiver but never booked therefore still shows up under Customers. A signer with no email is not added.
One ID photo per booking, selfie off by default
- Selfie is off by default. A new template no longer asks for a selfie unless you tick Require a selfie photo. Templates you already saved keep whatever you chose.
- A booking is only asked for an ID photo once. If the booking already has a driver's-license photo, the waiver does not ask for another. That photo can come from the ID upload step at checkout, or from an earlier waiver signed on the same booking (for example by another rider). With no ID on file yet, the waiver still asks for one.
- It only counts for that booking and that customer. An ID from an earlier rental does not count, and a photo a staff member added to the customer's profile does not count either. If a booking is reassigned to a different customer, the new customer is asked for their own ID.
- The rule is enforced when the waiver is signed, so a customer cannot skip the ID by editing the page.
Related articles
- Waivers: common questionsQuick answers on tracking who has signed, sending and resending waiver links, signing in person, building waiver templates, the default waiver, selfie and ID photo requirements, and waiver policy values like minimum age.
- Rental agreements and contracts - how customers signRenta has no separate contract feature. You write your rental agreement as a waiver template, and customers sign it online, from an emailed link, at your counter or at the kiosk. The signed copy is kept on the booking as a record and a PDF.
- Tracking which bookings still need a signed waiverSee upcoming pickups without a signed waiver, and send or resend the waiver link.
- Waivers, age minimums, and requirements on one itemChoose which waiver applies to one item, and set its minimum age and minimum skill level.
Still stuck? Ask the chat.
Was this helpful?