Connecting an AI assistant (Claude, ChatGPT and other MCP tools)
Let your own AI assistant, such as Claude or ChatGPT, read and (if you allow it) change your Renta data, using a step-by-step connect wizard or a key you create yourself, and choose exactly what it may do.
Where to find it
Settings → Integrations → AI Assistant (MCP) (the first section on the page)
MCP (Model Context Protocol) is a standard way for an AI assistant, such as Claude or ChatGPT, to connect directly to your business data. Once connected, you can ask the assistant things like "which bookings are overdue?" in plain words. Depending on the permissions you give, it can also change things, such as creating bookings or editing your fleet.
Where to find it
Click Settings, then Integrations. AI Assistant (MCP) is the first section. Only owners and managers can connect an assistant. Anyone else who tries to approve one sees "Only staff who can manage integrations can connect an AI assistant to this shop."
The section reads: "Connect your own AI assistant (Claude, ChatGPT, or anything that speaks MCP) to read your Renta data." A small What is MCP note explains that the permissions you grant can include write access, which means creating and editing real bookings, customers, fleet items and more, not just reading.
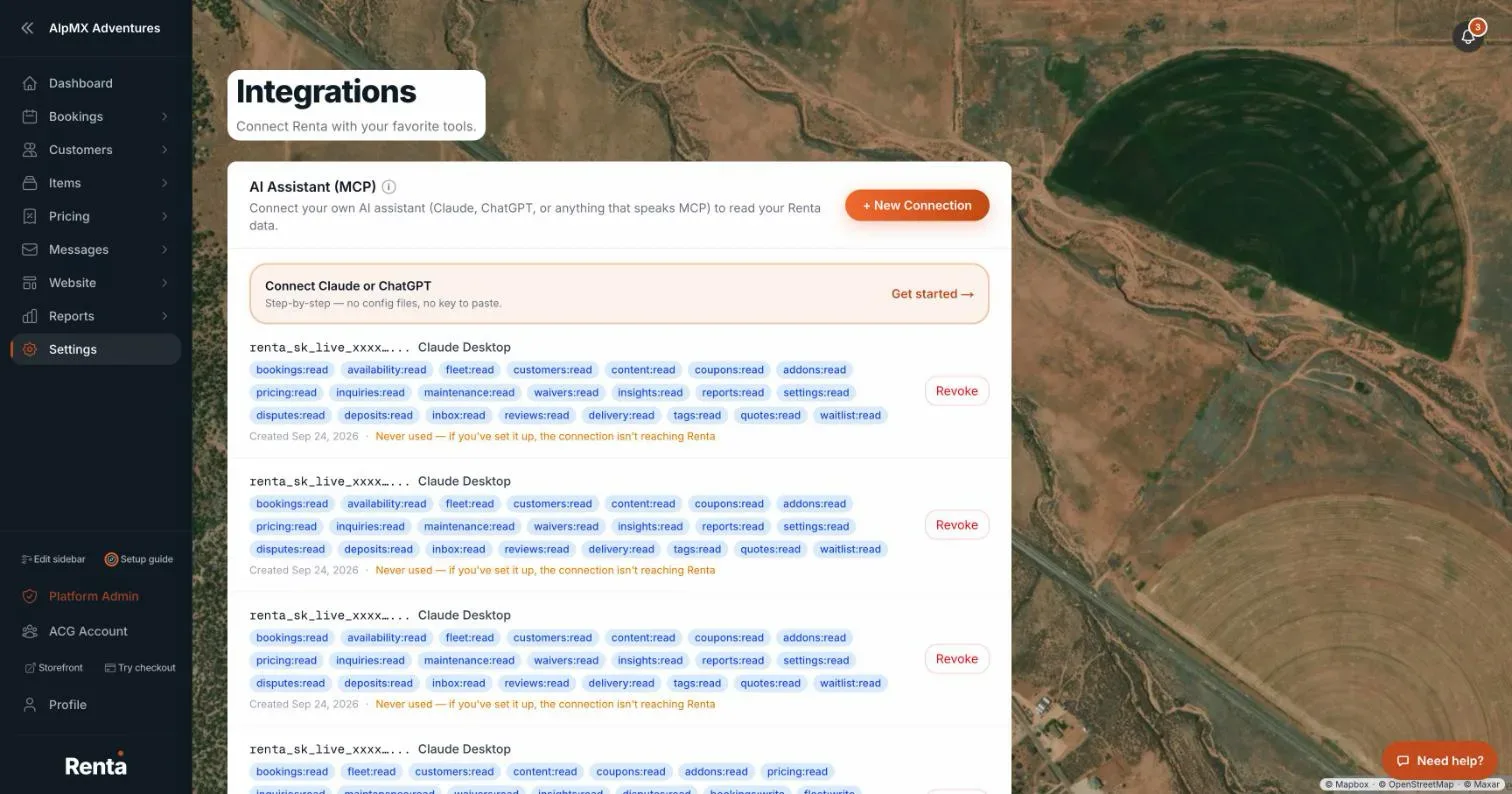 The AI Assistant (MCP) section with the Connect Claude or ChatGPT button, the connection list and the Connected AI apps list
Two ways to connect
- Connect Claude or ChatGPT (the big button, "Step-by-step — no config files, no key to paste.") is the easy way for Claude.ai and ChatGPT.
- + New Connection makes a key you paste into a developer tool such as Claude Code, Claude Desktop, Cursor, VS Code or Codex.
The Connect Claude or ChatGPT wizard
Click Connect Claude or ChatGPT (Get started →). The window has four steps.
1. Pick your AI app. Choose Claude.ai or ChatGPT, then Next. A link, "Using Claude Code or Desktop? Use an API key instead", jumps to the key method below. 2. Copy your connection link. Click Copy. You will paste it into your assistant. 3. Follow the steps inside your assistant. Click Open (app) settings to go there.
- Claude.ai: Settings → Connectors → Add custom connector. Paste the link, click Connect, then sign in to Renta and approve.
- ChatGPT: Settings → Apps & Connectors → Advanced → turn on Developer mode (needs a Plus, Pro or Business plan, on the web). Then Settings → Apps & Connectors → Create connector. Paste the link as the endpoint, set Authentication to OAuth, save, then sign in to Renta and approve.
4. Approve. You are sent to a Renta sign-in and approval page. Sign in, then click Approve. The wizard says "Waiting for approval…" and then "(app) connected" when it works.
If it does not connect after a couple of minutes, the wizard shows tips. Open Not working? for the usual causes: approving while signed into the wrong account, a missing Developer mode in ChatGPT, using the Claude phone app instead of the website or desktop app, or an error on the approval page (start again from your assistant).
The approval page
After you sign in, the page asks "Connect (app name) to (your shop)?" and lists every permission with a tick box. Permissions the app asked to read are already ticked. Choose what to allow, then Approve or Deny. Approving with nothing ticked gives "Choose at least one permission to grant." Only approve if you started the connection yourself.
Making a key connection
1. Click + New Connection. 2. Enter a Name, such as "Claude Desktop". 3. Tick the Permissions. Every Read permission starts ticked, and Write permissions start unticked and carry a warning mark, so giving write access is always a deliberate click. At least one permission is required. 4. Click Create Connection. 5. A window titled Connection Created shows the key once, with "This key won't be shown again. Copy it now." and a Copy button. 6. Under Connect your assistant, pick Claude Code, Claude Desktop, Cursor, VS Code, Codex or Other for ready-to-paste settings. Each tab gives its own instructions, a Copy button and, where needed, numbered steps. Then click Done.
What an assistant can be allowed to do
The permission list has one Read and (for most) one Write tick box per area. The areas are: Bookings, Availability, Fleet, Customers, Website builder, Coupons, Add-ons, Pricing rules, Contact inquiries, Maintenance, Waivers, Insights, Reports, Settings & checkout, Disputes, Deposits, Inbox, Reviews, Delivery dispatch, Fleet tags, Quotes and Waitlist. That is 22 areas. Availability, Insights, Reports, Disputes and Deposits are read-only. A few things are never available through a connection, such as deleting fleet items or pages, and customers' driver's license details. Each tick box carries a short note explaining exactly what it allows.
Building your website with an assistant
With the Website builder permissions, an assistant is told to work in this order: look up the available widgets, read the page, edit it, check the edit, save it as a draft, preview the draft, then publish. The tools behind that are `get_widget_catalog`, `get_page`, `validate_page_content`, `update_page_content`, `get_page_preview_url` and `publish_page`.
- Check before saving. `validate_page_content` is a dry run. It saves nothing and lists problems such as an unknown widget type, a widget outside the 12-column grid or sandbox code over 50KB.
- Preview the draft. `get_page_preview_url` gives a link to the unpublished draft. It only opens the draft while you are signed in to your admin in the same browser.
- Publishing over a live page needs a yes. If a page is already live and the draft is different, `publish_page` refuses and says how many widgets are live versus in the draft, until the assistant confirms with `confirmOverwriteLive`. A brand-new page publishes without that step.
- Undo. Each publish normally saves the previous live version first. `list_page_versions` shows them and `restore_page_version` copies one into the draft only, so you still publish it yourself.
- Connections made with a test key cannot change website content on a live business.
Custom Site mode
Instead of the drag-and-drop builder, your assistant can write a complete static website (HTML, CSS, JavaScript, images) for you. It needs the Website builder Read and Write boxes ticked, and works the same with the Connect Claude or ChatGPT wizard or a key connection. When it connects, the assistant is told the order to work in: check the site status, get the booking embed code, write `index.html` first, get a preview link, then publish. It works like the builder, in four steps: 1. Build with your AI. The assistant saves its work as a private draft. 2. Preview privately in Renta. The assistant (or Settings → Custom Domain → Website type → Preview draft) gives you a preview link that works for 60 minutes. Nobody else sees the draft. 3. Publish. Every publish is a saved version you can roll back to. Publishing alone does not change your public website. 4. Switch Website type to Custom Site to put it on your own domain. Only the Owner can do this, in Settings → Custom Domain → Website type. The button stays off until a Custom Site has been published and your own domain is connected on the same page. You can switch back to the Builder any time; your Builder site is kept. Your assistant cannot change this setting. If you ask Renta's team to build your site, they can switch it for you once it is published and your domain is connected.
- Booking buttons on a Custom Site open the normal Renta booking window (the assistant is given the exact embed code), so payments, waivers and availability work as usual.
- The assistant is told to add a small visit report to every page, so the traffic cards on Insights keep working once the site is live. Google Search and Google Analytics data come from Google. The indexing check and SEO audit still look at your drag-and-drop pages.
- Limits: 500 files, 5 MB per file and 50 MB in total.
Your connections
- Connections you made with a key are listed with the start of the key, the name, its permissions, the date created and Last used. A connection that has never been reached shows "Never used — if you've set it up, the connection isn't reaching Renta", which usually means the key was pasted in the wrong place.
- Revoke on a connection asks `Revoke "(name)"?` and warns that "Any AI assistant using this connection will immediately lose access. This cannot be undone." Revoked connections move to a Revoked list. Connections also appear, tagged AI Assistant, in the API Keys list. See Creating API keys for developers.
- Connected AI apps lists apps such as ChatGPT or Claude.ai that you signed in and approved directly, with the app name, Approved date and Last used (or "Never used"). Disconnect asks `Disconnect "(app)"?`, says the app "will immediately lose access to your Renta data. This cannot be undone."
If a list cannot load you will see "AI connections are temporarily unavailable — check back shortly." or "Connected apps are temporarily unavailable — check back shortly." Connections you already made still exist.
Example
You want your assistant to answer questions about bookings but never change anything. Choose Connect Claude or ChatGPT, follow the wizard, and on the approval page leave only the Read boxes ticked. Later, to cut it off, click Disconnect next to the app.
Good to know
- Write access lets an assistant change real bookings, customers, prices and your website. Start with read-only, and only add a Write tick for areas you want it to change.
- A connection acts for your whole shop, not for one person.
- Keys behave like passwords. Revoke one at once if it may have been shared.
Settings an assistant can never change
Even with a Write permission ticked, a connected assistant cannot change the owner-only settings. This keeps a key from being used to hand out powers your Owner has not agreed to.
- The Staff override switches (availability, prices, autotracked counters, starting unpaid rentals and keeping a cancelled booking's balance). The assistant is told they are owner-only and to use Settings → Team. The old ability to set "book over availability" through an assistant has been removed.
- Protected business settings: custom code, analytics tags, 3D Secure, photo ID verification and the pickup flow. These can only be saved from their own page in your admin.
An assistant trying to write one of these gets a refusal message and nothing is saved. Everything else you ticked works as before.
Related articles
- Common questions: QuickBooks, Google, smart locks, AI assistants, API keys, and webhooksQuick answers about connecting QuickBooks Online, Google, Instagram, RideDog, igloohome smart locks, Claude or ChatGPT (MCP), API keys, and webhooks, plus why a connection may be missing or greyed out.
- Connecting RideDogLink your RideDog account to see your GPS trackers and live vehicle locations right inside your Renta dashboard.
- Connecting QuickBooks OnlinePost your paid bookings and refunds to QuickBooks Online automatically, with sales tax recorded as money owed to the tax office.
- Connecting smart locks (igloohome)Connect your igloohome (iglooaccess) account so Renta can issue self-expiring door codes for bookings.
- Sending Renta events to another system (webhooks)Get a signed message sent to your own address automatically whenever something happens in Renta, like a new booking.
Still stuck? Ask the chat.
Was this helpful?